 English -
Version 3.6 of Train Director enhances the customization level of scenarios. In fact, it is now possible to associate scripts to almost every element present on a layout: signals, tracks, triggers and trains! By using scripts, it is possible to create complex conditions such as the creation of multiple itineraries, and to check the train's positions and movements, including the ability to create random delays.
The basic principle for using Train Director scripts is the execution of specific functions, activated when a particular event occurs. Each element on the layout reacts to different events. The script summary page lists all the events associated with each element type.
To explain the use of scripts you can refer to the following sample simulations included in the Train Director zip file:
- trainscr.trk: example of scripts associated to trains. The simulation prints in the Alert window various messages when the state of the train changes (for example when the train enters the territory or when its direction is reversed).
- signalscr.trk: example of scripts associated to signals. The simulation shows how it is possible to implement advance signals or protection signals conditioned to the entry path into a station.
- trackscr.trk: example of a script associated to tracks and triggers.
How to associate Scripts to Elements
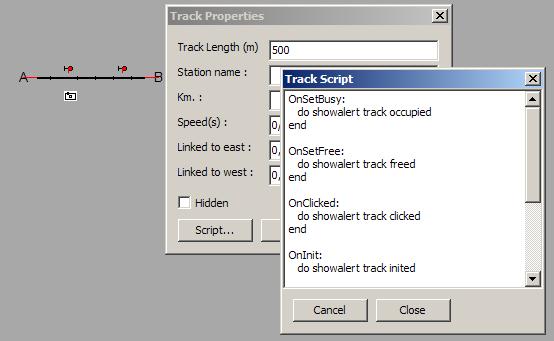
Each script is a portion of a text file associated to a layout element. Train Director allows the introduction of scripts associated to tracks directly from the track property dialog:
For trains, the scripts are embedded in the .sch file, together with the train's schedule. Here is an example of a script associated with a train:
Train: T3
    Enter: 0:12, A
    0:14, -, S1
    Script:
        OnShunt:
            do showalert T3 shunting
        end
        OnReverse:
            do showalert T3 reversed
        end
    EndScript
.
For signals, scripts are separate text files, called "Train Director Scripts", or simply .tds files. These files can be associated to the various signals from the signal's properties dialog:
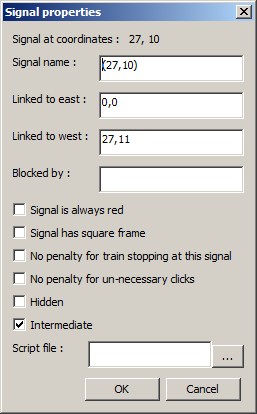
The reason for these differences is that for signals it's very common to re-use the same script for more than one signal (for example all advance signals will share the same script).
All scripts have a common syntax, composed of the name of an event, followed by one or more rows with conditions, expressions or commands. The events have the following structure:
OnXXXXX:
# conditions, expressions, commands
....
end
where XXXXX specifies the event, and end specifies the end of the conditions, expressions or commands associated with the event.
Expressions are used to read or change properties of tracks, signals and trains. While the properties are specific of each element type, and are listed for each type in the scripts summary page, the elements themselves can be referred to in different ways:
- by specifying the element's coordinate: Track(x, y) specifies the track at coordinate x,y.
- in relation with the train or signal or track affected by the event: Track.property, Train.property, Signal.property.
- in relation with the element that triggered the event: .property.
For example, the ".aspect" property of a signal can be changed with the following expression:
.aspect = red
Expressions are also used to specify conditions, by the use of comparison operators.
The following is an example of a conditional expression:
Signal(10,23).aspect = red and Train(R2001).speed > 100 or Train(R2004).status = stopped
As you can see, different expressions can be linked by the operators "and" and "or".
The following is a list of conditional operators:
= equal to
! different from
> greater than
>= greater or equal to
< less than
<= less than or equal to
and condition is true if both the left and the right conditions are true.
or condition is true either the left condition or the right condition is true
In addition to layout elements, you can use the random operand in an expression to get a random value between 0 and 99 included, as in the following example:
random < 40
In this case, the condition is true (on average) 40% of the times.
Another operand that can be used in expressions is time, to refer to the "simulator clock". For example:
time > 1430
The value of the time operand is expressed in hhmm, that is hours+minutes; in the example, the condition is true after 14:30 hours. There is no provision for AM/PM notation.
In addition to expressions to change the properties of an element, scripts allow the use of 2 types of commands:
- condition commands
- imperative commands
Condition commands have the following structure:
if expression
command1
command2
...
else
command3
command4
...
end
The if command checks if the expression is true, and if it is,
it executes the command sequence 1, 2, etc., while ignoring the command sequence 3, 4, etc.
If the expression is not true, the if command ignores the command sequence 1, 2 etc.
and executes the command sequence 3, 4 etc. instead.
Note that the else part is optional, and it can be omitted if there are no commands to execute if the condition is not true.
Also note that an if command can contain other if commands, so that one can specify more conditions that will be checked only after the outer if has been checked.
There are also some imperative commands, which are executed sequentially, one after the other.
The "do" command allows to change the behavior of the simulator, in the same way as what happens for triggers.
The available uses of the do command are:
| do stationsched | shows the station schedule |
| do fast | increases the simulation speed |
| do slow | decreases the simulation speed |
| do stopsim | Stops the simulated clock. Useful when detecting a specific condition that needs attention from the user |
| do shunt train | starts shunting the specified train |
| do traininfopage train | shows the specified train schedule in an HTML page |
| do traininfo train | shows the specified train's schedule in a dialog |
| do decelerate value train | reduces the speed of the specified train by the specified value (in km/h) |
| do accelerate value train | increases the speed of the specified train by the specified value (in km/h) |
| do reverse train | reverses the specified train's direction |
| do click x, y | simulates a left mouse button click on the specified coordinates |
| do rclick x, y | simulates a right mouse button click on the specified coordinates |
| do ctrlclick x, y | simulates a left mouse button click with the Ctrl key pressed on the specified coordinates |
| do itinerary name | activates the specified itinerary. It is not necessary to have a button on the layout associated to the itinerary |
| do assign oldtrain,newtrain | assigns the rolling stock of "oldtrain" (which must have been arrived to its final destination) to "newtrain". The two names must be separated by a comma. |
| do play soundfile | plays the specified sound file |
| do skip | advances the simulator's clock to 3 minutes before the next event (useful to avoid waiting several minutes when there are no trains on the layout) All trains must be stopped or arrived or exited for this command to be allowed |
| do split train,length | splits the specified train in two pieces, and shunts the front piece to the next station |
| do script file | executes the OnEnter: action in the script contained in the specified file |
| do showinfo file.htm | shows the content of the specified HTML page in the "Scenario Info" window |
| do showalert text | shows the specified text string in the alert window |
| do clearalert | clears the alert window |
The "call" command executes the commands defined in a specific procedure. The syntax is as follows:
call procName
where procName is the name of a procedure. See the Procedures chapter for more details.
The "return" command stops executing a command sequence and exits the current procedure, or, if the commands were from an event, it returns immediately to the simulation. For example:
OnUpdate:
    if .aspect = red
        return
    end
    ...
end
All commands after the return line will be ignored.
In the next page we describe in detail the scripts that can be associated with signals. Also look at the various scenarios available from the scenario directory page, for more examples on how to use Train Director scripts.
Procedures
Version 3.9p of Train Director introduces the ability to re-use sequences of commands regardless of the track element that activated the script. So, if there are actions that need to be activated multiple times in a scenario, it won't be necessary to duplicate the same sequence of commands in multiple scripts.
Block of commands that can be re-used are identified by a line like the following:
procedure name
...
end
where name is the name that identifies the sequence of commands. The line end terminates the sequence of commands. Of course, it's possible to define more than one procedure one after the other. For example:
procedure name1
...
end

procedure name2
...
end
To execute the commands defined in a procedure, use the call command, and give the name of the desired procedure. For example:
OnUpdate:
    call name1
    call name2
end
In this example, all commands defined in procedure name1 will be executed, followed by all commands defined in the procedure name2.
You can take a look a the scenario "39pCall.trk" found in the Examples folder in the Train Director package to see how procedures can be called.